Showing posts with label Simplicity 1873. Show all posts

Thursday, 6 June 2019

Spring Cabbages


I've had my eye on this Kaffe Fasset cabbage fabric since I first saw it at Modern Bee, had it in my stash for years, and finally, two years ago decided to hold my breath, grab my scissors, and cut.


The pattern is my old fav, Simplicity 1873. I wanted to change things up a bit, though, so I altered the neckline in both the front and back.


For the front, I changed it to a sweetheart neckline. Since I was making this for a fancy wedding, I won't lie, part of the sweetheart neckline decision was to get the girls "out there". My biggest mistake while putting in the sweetheart neckline was not initially interfacing the neckline. I tried it on and found that the neckline didn't hold it's shape due to the lack of support and so I had to go back in there between the main and lining to apply some fusible to support the neckline shape.

For the back I thought I would try just a simple V neckline, which was easy to do.


The skirt is a full circle skirt, with pockets (of course!) added for practicality. I hemmed using horsehair braid, my still fav method.

As I mentioned, the fabric is a Kaffe Fasset quilting cotton. For the lining, I used a royal blue Bemberg Rayon that I still have from when my local Fabricland closed.


For the wedding, I made Trev a matching tie, and I must say that we look pretty cute when we are out and about in this combo.


Other than that, there's really not much to say about this beauty. It's one of my fav makes to date just because the pretty fabric flatters my skin tone so well. We took these photos along the Niagara Parkway when the cherry and Magnolia trees were all in bloom. Spring along the Parkway is always lovely.

Sunday, 7 October 2018

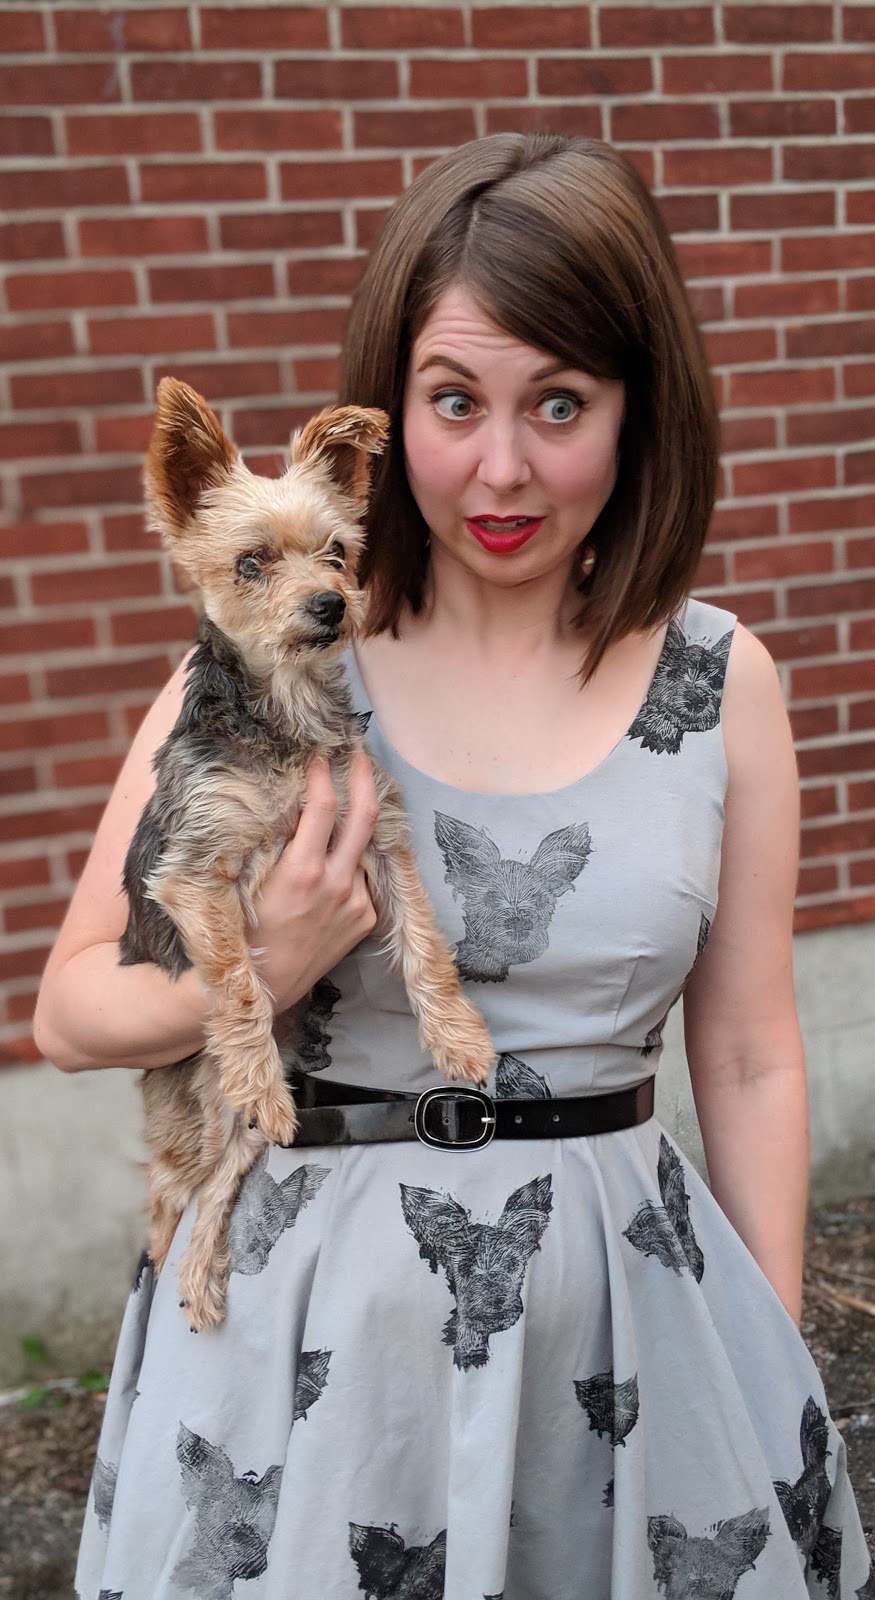
Peak me.

I did a thing and CANNOT wait to show you guys!


Let's take a closer look:
Notice any similarities?

Last year I took a printmaking class at Rodman Hall. We did monoprinting using Gelli plates, made printing blocks from styrofoam plates and sticky-back fun foam:
A My Favorite Murder themed tote bag I made for a Christmas exchange last year.
...but most of our time was spent creating relief block prints out of lino. When deciding what to make prints of, it was pretty easy to decide I would carve an image of Sweet Dee's face into the lino. I mean how could I not?


SO. FRICKING. CUTE.

My lovely instructor, Kristen, suggested at some point that I experiment with the fabric ink that we had in class, and LIGHTBULB! YES I WILL MAKE A DRESS WITH DEE'S ADORABLE FACE ON IT.
I used my trusty Simplicity 1873 altered scoop neck bodice and added a circle skirt (with pockets, duh!).
Since this is a bodice I've sewn up many times before it went relatively quickly (as quickly as avoiding sewing 12 darts can go for a procrastinator), and the skirt went quickly too. The longest part of the process, and the most avoided, was having to heat set all the cute little Dee faces with an iron so that they don't come out in the wash. 
For the fabric, I used some quilting cotton that I picked up with the express purpose of this dress. Everything else in my stash already had a print or did not have enough yardage.
Look at how the back hangs!!!! SO puuuurrrrrtyyy.
In terms of construction when making my own fabric print, I had to make some adjustments. The first thing I did differently was I precut all the bodice and skirt pieces before printing on them. This allowed me to choose print placement (a.k.a. avoiding dogface boobs). In fact, since I knew I was going to put in pockets, I sewed the pockets and side seams, and even pressed the centre back skirt seam under so I could get perfect pattern matching just by lining everything up and having the stamp lay across both pieces. Doing this did result in a few lines where the bulk of the seams interrupted the print, but I preferred this to farting around with the stamp and trying to match it all after the fact. I only wish I had thought to do the same for the back bodice pieces as well.
I printed using Speedball screen printing ink, hence why each little Dee is inconsistent. For my next fabric, which I've already printed, I used their block fabric ink and I got a much nicer and more consistent print.
My handmade linocut.

I used horsehair braid again for the skirt hem, but instead of machine hemming it with the blind hem stitch like I usually do, I hand-sewed the hem. Sometimes you need to add those little touches to special pieces like this.
I used my stash Rayon Bemberg for the lining. Yup, that's the same stuff that I picked up like three years ago when my local Fabricland closed.
Overall I can't say much more than I LOVE THIS DRESS. I mean, we all knew I was a crazy dog mom, but like I've recently said, taking things to the next level makes me beyond happy. I have already been playing around with more printmaking and fabric and can't wait to see what I can do next!
Let's not forget our tradition of dumb faces:
Had to crop Trev's finger out of this one 😂

And one for Dee with her eyes closed:
So tell me: would you make your own fabric? What would you put on it? I need all the ideas!


PS. LOOK AT THIS DOODLE A STUDENT DID ON THEIR NOTE THE FIRST TIME I WORE THIS TO WORK 😍... doesn't it just make you want to squeal with happiness?! Oh yeah, and it's like maybe an inch and a half big so it's doubly cute.😍😍

Thursday, 29 September 2016

Refashioners 2016: Jeanius!

Jeans. Ugh. I haven't actually worn a proper pair of jeans in a loooooooong time. After seeing Portia's post about this year's Refashioners theme, I wasn't really sure if I should participate. I mean, I've participated in contests before only to end up with a garment I never wear.
So I decided to lay out some ground rules for participating:

1. My end garment MUST be something I will wear. Not like to a wedding one time, but often. (i.e. Must resist all temptation to make a ball gown just because I like to be crazy like that.)

2. In line with rule #1, I will only participate if I find a coloured or patterned pair of jeans in a colour/pattern I like since I am not huge on plain old denim.

In essence, I would only participate by making this challenge work for me, not the other way around.
Well...BINGO! I found these ridiculously amazing patterned jeans at the local thrift shop. I won't share prices because, needless to say, thrifting in Canada ain't cheap. But those jeans! And they look like beautiful brush strokes! I was sold.
I decided really early on in the process that I wanted something that would work with the jeans, opting for a dress with more structure. I had about a million ideas for this (which if you follow me on Pinterest, you will undoubtedly have noticed), but decided that because of the limited amount of fabric, I needed to take it one step at a time.
First I started with the bodice. After some humming and hawing, I decided that I wanted the bodice to be in the patterned jeans. Originally I had wanted to do the back bodice in the patterned jeans with burgundy jeans in the front (with a front zipper), but decided I liked the pattern too much to have it hide behind me all day. So I whipped the bodice up using my trusty Simplicity 1873.
Next I had to decide on a skirt. After seeing how artsy the bodice looked, I wanted a skirt that matched the artsy-ness of the bodice but more so in terms of the shape and structure of the skirt. I had really liked the looks of the three skirts below. I settled on the far left one (with input from my sister), until I realized I would need two jeans of the same colour to get enough fabric for it. I had already bought different coloured jeans and on principle I wasn't going out to pick up a fourth pair. (And I didn't like the idea of just using the two different colours to make up this skirt.)
That's when I came across the below pic on Pinterest.
EUREKA! I thought this would look pretty nice with the two tones and I knew I would have enough fabric to pull it off. I used a basic skirt block (for the first time), and just sort of laid things out until it worked. I don't think you can call that draping, but whatever it was, I like the outcome.
I used the inseam of the white jeans to make the front overlap, and the hem on both the burgundy and white parts of the skirt are the jeans hems (Hooray for no hemming!).
At this point, I tried the dress on and.....I hated it. It didn't fit right and it was missing something. I took the hips in where it meets the waist and took in the back zipper at the top by a lot. Taking it in to be more fitted completely changed my perspective on the dress.
I then decided to make a big bow to add just that final little "oomphf". I figured the jeans would help the bow to hold its shape really well. Luckily, I was right and I am SO glad I added it! I think it takes this dress to another level. I also really like how you can see the jeans pocket in the bow. It's my little tip of the hat to the dress' former life.
As a last little detail, I used some of the leftover jeans scraps to make some matching earrings.
This dress has been such an emotional rollercoaster. I love it, I hate it, I need a break from it, I might like it sort of, I love it, I hate it, I love it but it doesn't fit, it fits but it is too plain, I LOVE IT! (Not to mention cutting through my fabric while trimming a seam, accidentally cutting out a pattern piece twice without remembering to flip the pattern, and almost tearing a hole in the front when pinning on the bow with a broken safety pin in order to determine bow placement.) I've really learned a lot and am so happy to see people's reactions when I tell them this used to be jeans. (Read: everyone is amazed!)
I'm pleased to say that I feel like a fancy babe when I wear the dress and thus will be wearing it often to work (i.e. mission accomplished).
Well, only one day left until the deadline: did you participate in the Refashioners this year? Would you wear something that is quite "out there" like this is? If you've already made something you would classify as "artsy", please do share!

Thursday, 26 March 2015

One Day I'll Get This Timing Thing Down.....a.k.a. Crazy Dog Lady Sewing Challenge Dress!!!

Holla! How are you? I've had a very crazy two weeks over here and am very much looking forward to this weekend. As for this dress, I'm only just over a week late, and technically, I'm not completely done because I haven't slip-stitched the lining down but I already wore this to work today so I count it as good enough for pictures. And like I've said before, since I can't win anything anyways, it's not really a huge deal (to me at least!).
I made this up in Simplicity 1873, just like my pink fruity-floral muslin, with the only changes being that I changed the shape of the arm holes slightly so that they don't rub like my previous version(s), I didn't make the skirt as fully gathered, and I lowered the hemline to just below the knee instead of just above like I normally do. That's it! 
I really wanted in-seam pockets, but by the time I finally got around to sewing the skirt, I knew I wouldn't have time to pattern match, and I knew that if it wasn't matched, I might go a little mad. So, just as with my muslin, I settled for a patch pocket. At first I wanted to make a bone shaped patch pocket. But then, I thought, there is potential that it may not turn out looking like a bone, but rather, something inappropriate (a penis), and seeing as I work in high school, that might not be a very good idea. So, after a quick search on Pinterest, I found a dog-shaped pocket and decided I would try to wing it.
I decided to try to make it blend in in case it looked like crap. Unfortunately, because I was winging it, a few parts got weirdly stretched out. Fortunately, because I made it (mostly) match up, unless I point it out to you, you can't really tell.
I also made a little bandanna for Harley to go with all the other ones he already has kickin' around the house. We actually like to put it partially on his head and call to him saying, "Awwww! Look at the babushka lady! Look at the babushka lady!!!!"
SQUIRREL!
I am pretty proud with how far my skills in pattern matching have come, though I have to say that when I am off by thismuch, it makes me a little twitchy.
The skirt is matched really well, but I get twitchy when I look at the bodice too close.
Also, there totally is a hook and eye there but I just didn't do it up. Whateva! I do what I want!

I kind of think I look like an elementary art teacher in this, especially with the blue button up underneath, but I went ahead and wore it this way to work anyways. Overall I'm really happy with how the dress turned out and can't wait to wear it without the button up once the weather warms up (which it never will). I've only worn it one day and already have gotten compliments from everyone I come across! There is something to be said for unique fabric designs. Thank you whoever introduced me to Spoonflower!
Not much else to say, really except how amazing everyone's makes for the challenge were! If you haven't had a chance, go to the flickr group and check them out....OR EVEN BETTER!!! check out Tanya's finale part one, and Sophie's finale part two. And be sure to check back here on Saturday to find out who won our four amazing prize packs (if you need a refresher on prizes, see here and here).
Yes, we are listening.
Final note: at the end of every post, if you hadn't noticed, I always try to post a link. Click it today, you won't be disappointed. Anywho, can't wait to see you back here on Saturday! Have a great Friday! :)